When a small stainless steel puller tool breaks at the weld, a common cause is a stem welded only onto the surface of the head, so that one small ring of weld carries the whole pull. We build these tools differently. The end of the stem is reduced to a pin, the pin goes through the head, the shoulder of the stem sits on the top face, and we weld at the top and at the bottom. We make these tools from 1 piece, and in repeat batches for companies.
We wrote this down after a buyer asked us for two samples of a small three-claw tool in 304 stainless steel. The tool has a Y-shaped head on a slim round stem, it goes into a specific position, and then it is pulled. It is not a catalogue item. For two pieces, cutting a wide head and a slim stem out of one solid bar was not practical, so the head and stem had to be made separately and welded.
The first thing we asked was where the force goes when someone pulls, and what happens if the head lets go. A head left behind inside an assembly is a bigger problem than a broken tool.
Where a One-Side Weld Lets Go
The quickest build is to stand the stem on the head and run a fillet weld around it. It looks finished, and under a light pull it may hold. Under a hard pull it has two weak points.
The face under the stem is not fused, so the root of the weld sits where the load tries to open the joint. And a pull is rarely straight. If one arm catches before the other two, the load comes in off centre and one side of the weld ring takes most of it. The stem is only a few millimetres in diameter, so there is not much weld to begin with: the weld area is about π × stem diameter × weld throat.
A larger bead helps a little, but on a part this small it also adds heat. Welding a broken tool again in the same place keeps the same joint.
How We Build the Joint Instead
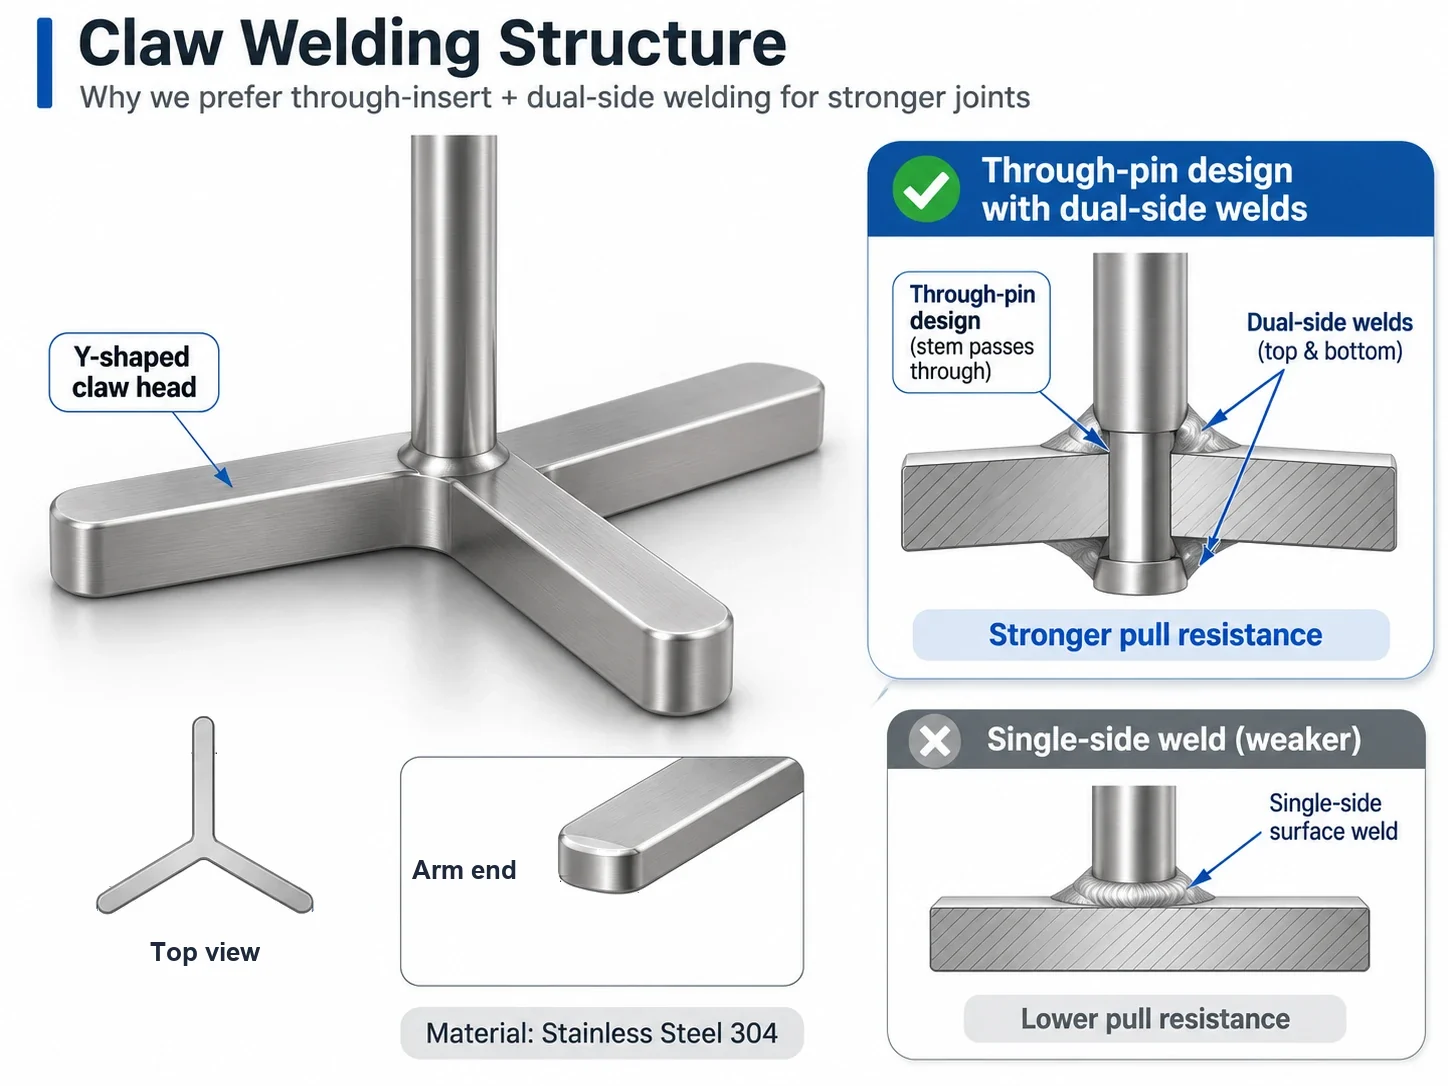
We advised against the one-side weld and proposed a different joint. The stem end is reduced to a smaller pin. The pin goes through a hole in the centre of the head, and the shoulder of the stem sits on the top face, which sets the stem square to the head before any welding starts. We then weld around the shoulder on top and around the pin on the bottom.
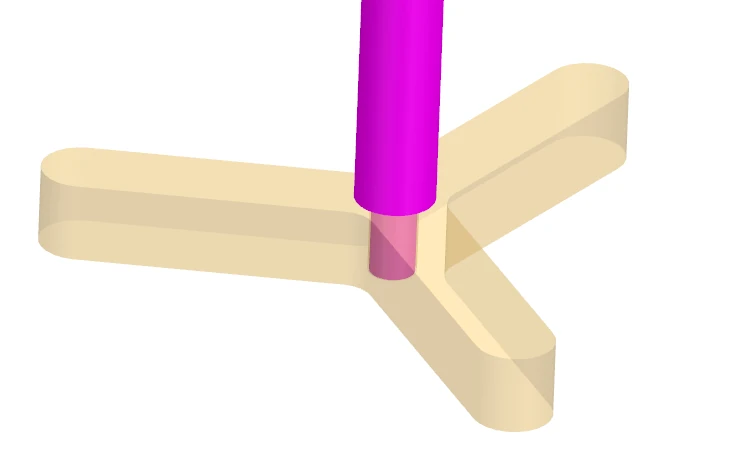
This changes the way the load travels. The hole wall supports the pin against side load, so bending goes into the thickness of the head and not into the root of one weld. When the stem is pulled, the head is pushed towards the end of the pin and the bottom weld holds it there, the way the head of a rivet does. A second weld ring also adds weld area, so one ring no longer carries everything.
Keeping the Bottom Flat Without Losing the Weld
The bottom weld holds the head against the pull, so it cannot be ground away when the tool has to sit flat or pass through a hole. We make a small recess around the pin before welding. The weld fills the recess, and grinding takes off only what stands above the surface.
A chamfered recess also gives better access to the root of the joint when welding, and because the weld in it is wider than the hole, it has to shear before the head can move along the pin.
As Welded or Blended
The top weld can stay as welded or be blended into a radius. If the tool is pulled now and then and looks do not matter, we leave it as welded. If it will be pulled again and again, we blend it, because cracks tend to start at the sharp edge where the weld meets the stem and the head. Blended surfaces are also easier to clean. We smooth that edge without cutting the weld thinner.
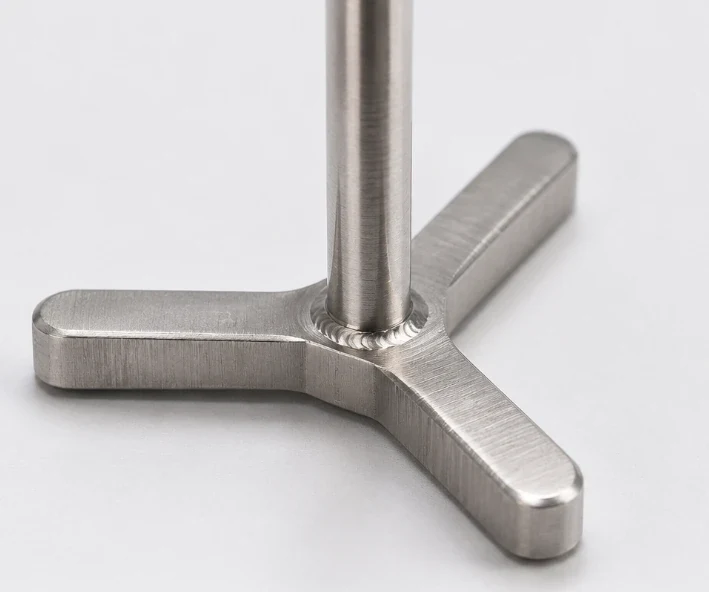
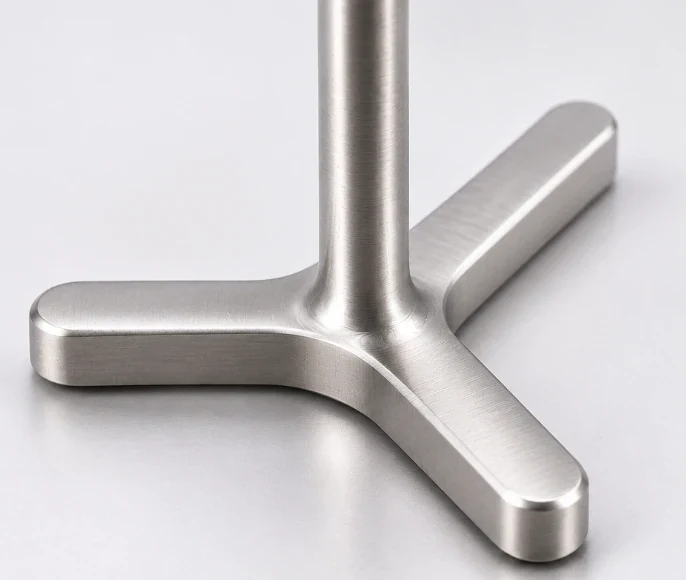
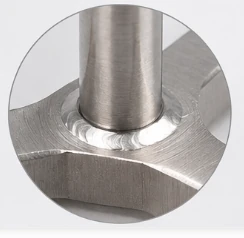
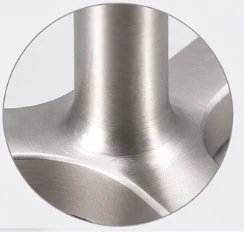
Left: top weld as welded. Right: top weld blended into a radius.
What We Read From a Broken Tool
If you already have a tool that failed, the place it broke tells us what to change.
| What happened | What we suspect | What we change |
|---|---|---|
| Head came off at the weld under a hard pull | One weld on one surface carried the load | Stem through the head, welded on both sides |
| Joint cracked after repeated use | Sharp weld edge under repeated load | Top weld blended into a radius |
| Bottom weld stops the tool sitting flat or fitting a hole | Raised weld on the bottom face | Small recess, weld ground flush |
| Stem bent or broke away from the joint | Stem too thin for the load, so a better weld will not help | Stem size or material, agreed with you |
Not every part needs this joint. If it only locates something and nobody pulls on it, a single-side weld can be enough, and we will say so rather than add a hole and a second weld you do not need.
Company Orders: From an Approved Sample to Series Supply
A tool like this can also be a company purchase: a service tool for a group of machines, a tool supplied with a product, or a tool for an assembly line. An engineer or buyer in that position has a different problem from someone replacing one broken tool. Every piece in the batch has to behave like the approved sample, and the next batch has to match the last one.
We start with a small sample run that your engineers try on the real job. Once it is approved, the drawing, the weld position and the finish are fixed and carried forward with the inspection plan. We also look at the route again at quantity: if one-piece machining comes out cheaper per piece than the welded build, we tell you.
| Purchasing question | How we work |
|---|---|
| Quantities | From 1 piece, through sample runs, to repeat batches and call-off supply against a blanket order |
| Price | Approved drawing quoted at 1, 10, 100 and 500 pieces; about 15% below the 100-piece unit price at 500 pieces and about 25% below at 1,000 |
| Production time | Machined parts take about 5 working days for up to a few dozen pieces, 15 for 50 to 500, and 15 to 25 above that; welding and finishing are added on the quote |
| Inspection | First piece measured and reported; dimensional reports and first article inspection on request |
| Material | Alloy can be checked with a handheld analyser; EN 10204 3.1 certificates by prior arrangement |
| Quality system | ISO 9001 certified |
| Confidentiality | NDA available for your drawings |
| Delivery and payment | Shipped DDP door to door; bank transfer to local accounts in your currency |
| Distributors | Neutral packaging, your part number on the label, direct shipment to your customer |
If you are moving a tool from one-off samples to a longer supply programme, our OEM manufacturing page sets out how that works.
Welding Is One Step in Making a Custom Part
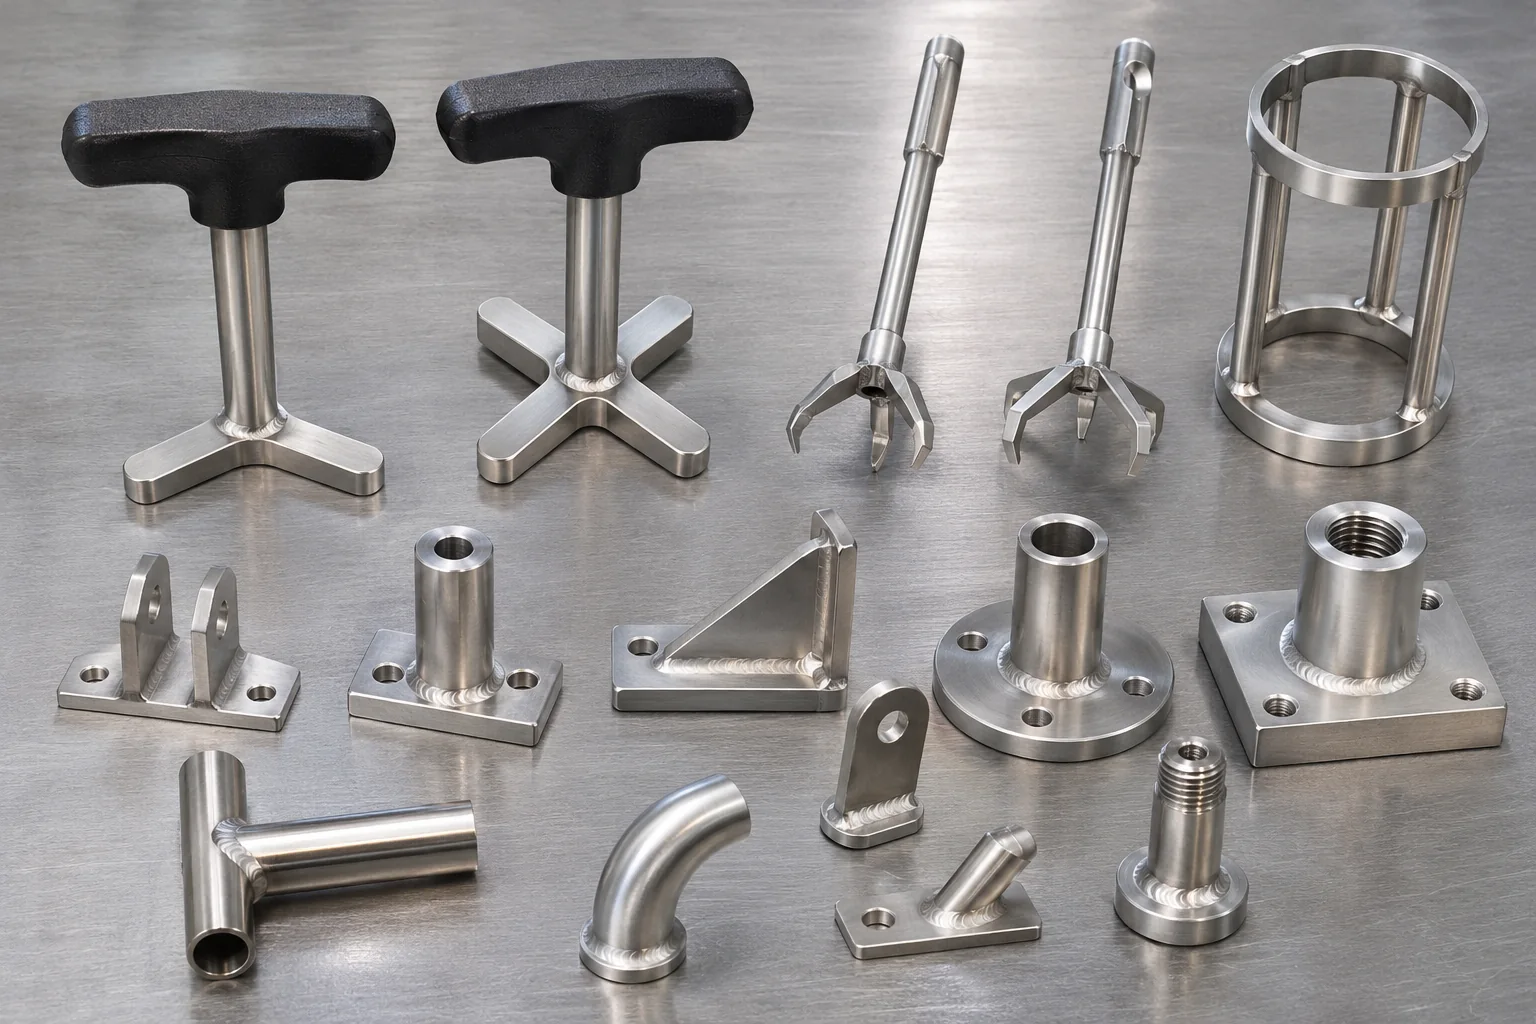
Welding is one way of getting to a finished part. We start from the custom part you need and then choose the process. A metal part may be CNC machined, turned or milled from bar, laser cut from sheet and folded on a press brake to a workable bend radius, or built from several of these and welded.
A bracket with a gusset, for example, can be milled from solid or made from a laser-cut body and welded. We choose by the load, the quantity and the price per piece. If another process gives you a stronger or cheaper part than the one on your drawing, we tell you before we quote it.
What We Need From You
EKINSUN is a custom parts manufacturer in Shenzhen, China, and we make tools like this from 1 piece. A drawing, a hand sketch or a sample is enough to start. If a tool has already broken, send it or a photo of the break and we can copy the shape from the sample and build the joint differently.
Tell us how the tool is pulled and roughly how much force it sees, whether the bottom has to sit flat or pass through a hole, the material and the quantity. For a company order, add the batch size, the expected yearly quantity and any inspection or document requirements. We reply with a quote in 12 hours and send a dimensioned drawing for your approval before production. Two welds put more heat into a small part, so we agree the straightness of the stem on that drawing.
What is written here is our design reasoning, not a rated load. If the tool has to hold a stated force, put that force on the order so that it can be tested on a sample. If your drawing already shows the weld, the symbols in ISO 2553 or AWS A2.4 can call for a fillet weld on both sides.
Questions About This Joint
EKINSUN, a custom parts manufacturer in Shenzhen, China, makes custom stainless steel puller tools from 1 piece up to repeat production batches, from a drawing, a sketch or a sample. We review the joint before making the tool and quote in 12 hours.
Yes. We start with a sample run for your engineers to try, then carry the approved drawing, weld position and finish into the series. We quote the approved drawing at 1, 10, 100 and 500 pieces, measure and report the first piece, and can release repeat batches on your schedule.
Re-welding in the same place gives the same joint, so it tends to break in the same way under the same pull. If the break is at a weld on one surface of the head, we change the joint: the stem goes through the head and is welded on both sides.
A second weld ring adds weld area, so one ring no longer carries the whole load. With the stem through the head, the hole wall also takes the side load, and the bottom weld holds the head on the pin when the stem is pulled.
Yes, if a small recess is made around the pin first. The weld fills the recess and grinding takes off only what stands above the surface. Without a recess, grinding a raised weld flat would remove most of it.
The head is much wider than the stem, so most of the bar would become chips and a long slim stem flexes while it is cut. For 2 pieces that was not practical. For a larger quantity, or where no weld is accepted, we look at it again.